
Run A Farm Farm Management: Workers and Vehicles to Set Up at Every Stage
Which confirmed workers and vehicles to set up at each stage of your Run A Farm farm, and exactly what each one takes over: Stocker, Planter, Farmhand, Tractor Driver, Garage and Farm Bike.
Quick answer
Set up the Farm Office hires that match the work your farm already does: a Stocker to carry eggs from the nests to your stand, a Planter to sow your empty fields, Farmhands to harvest ripe fields and, once the Tractor Barn unlocks the slot, a Tractor Driver to run your tractor through ripe fields for you. On the vehicle side, the Garage creates the TRUCK BAY for trucks that haul goods to town, and the cheap Farm Bike carries you into Town Park.
- Stocker — carries eggs from the nests to your stand, 12 at a time (cap 3)
- Planter — sows your empty fields with your seeds, one field per trip (cap 2)
- Farmhand — harvests your ripe fields, carrying 15 crops at a time (cap 6)
- Tractor Driver — drives your tractor through ripe fields (cap 1, locked until you have the Tractor Barn)
- Garage ($1,200) creates the TRUCK BAY; the Farm Bike ($15) carries you from the farm into Town Park
Run A Farm ties a few loops together: you collect eggs and sell them at your stand, plant crops and harvest them with tractors, drive your trucks to town to sell your goods, and dig for ore in your own mine. Workers and vehicles are how you hand those jobs off. Each confirmed worker takes over one chore — carrying eggs, sowing, harvesting or driving the tractor — and each vehicle covers a distinct job: the Farm Bike carries you, trucks haul goods to town, and the tractor harvests your fields. Below is what each one does, which stage of farm it pays off at, and a setup order that follows the cash.
Every worker and what it takes over
All hires come from the Farm Office, which costs $500 to build. Its workers panel shows each role's job description, how many of that worker you have already hired against its cap, and the price of the next hire. Two things to know before reading the table: every extra hire of the same type costs more than the last, and the prices shown here are the figures displayed on screen during play — treat them as a scale, not a fixed price list.
Farm Office workers and the job each one takes over
| Worker | What it takes over | Cap | Observed hire cost |
|---|---|---|---|
| Stocker | Carries eggs from the nests to your stand, 12 at a time | 3 | $250 for a first hire, $550 for a second |
| Planter | Sows your empty fields with your seeds, one field per trip | 2 | $400 |
| Farmhand | Harvests your ripe fields, carrying 15 crops at a time | 6 | $1,020; a late-game hire was $8,011 |
| Tractor Driver | Drives your tractor through ripe fields | 1 (locked until the Tractor Barn) | $25,900 hire tier observed late game |
Notes on those numbers:
- The Stocker is the cheapest worker hire in the observed range and the first one worth buying. Egg sales drive the early game, and a Stocker ends the walk between nests and stand.
- Farmhands scale the furthest: six slots is more than any other worker type, so harvesting capacity keeps growing with your cash.
- The Planter manages with only two slots because it covers a whole field per trip.
- The Tractor Driver hire reads 'Needs Tractor Barn' until the barn exists, and even then only one is allowed — plan it as a late purchase.
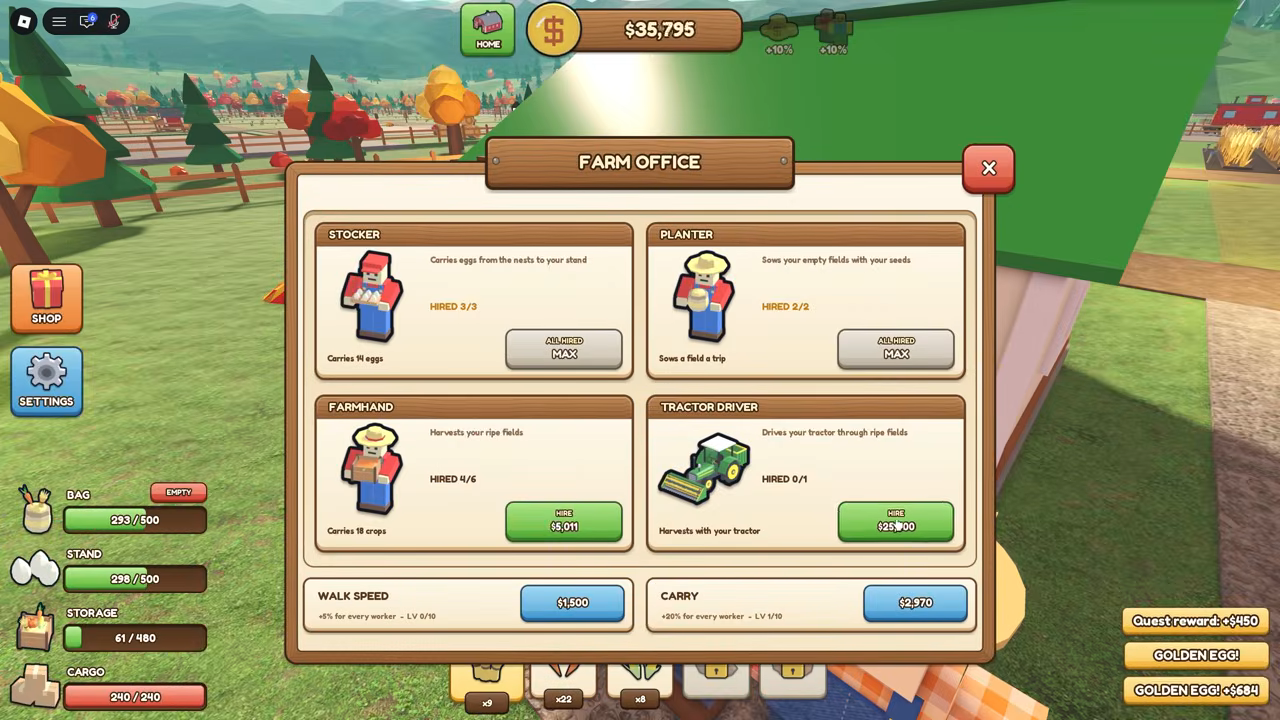
On a developed farm the same panel shows the scale late-stage hires reach — most Stocker and Planter slots maxed out, a Farmhand at $8,011 and the Tractor Driver tier at $25,900:
Matching each hire to your farm's current stage
The right next hire is simply the one that takes over the chore you are personally doing the most right now:
Decision guide
The pattern underneath: a hire only pays once the matching activity exists on your farm. Eggs make the Stocker worthwhile, fields make the Planter and Farmhand worthwhile, and the Tractor Driver is not even purchasable until the Tractor Barn is standing.
A setup order that follows the cash
If you would rather follow one route from fresh start to late farm, this order tracks what your money is doing at each stage:
Roadmap
- 1
Egg stand stage
Keep the stand stocked without making every egg run yourself.
- Build the Farm Office ($500)
- Hire your first Stocker (observed at $250)
- Put spare cash into more coops — extra eggs mean steadier stand sales
- 2
First fields
Turn empty ground into crops without hand-sowing and hand-picking.
- Buy Field 1 ($120) and build the Seed Market ($50), where you buy and unlock seeds
- Hire a Planter ($400) to sow your empty fields
- Add Sprinklers ($120) so crops grow 30% faster
- Hire a Farmhand ($1,020) to harvest the ripe fields
- 3
Vehicle stage
Move yourself and your goods faster.
- Build the Garage ($1,200) to create the TRUCK BAY
- Buy the Farm Bike ($15) for the ride into Town Park
- Bring in a tractor so fields are harvested by machine instead of by hand
- 4
Late-stage scaling
More hands on every loop.
- Fill Farmhand (6) and Stocker (3) slots, expecting each hire to cost more than the last
- Build the Tractor Barn and hire your one Tractor Driver (hire tier observed at $25,900)
- Raise Walk Speed and Carry so the crew you already own moves faster and hauls more
Storage Racks ($800) round the crop side out with room for 120 crops — handy once hired Farmhands are harvesting more than you want to carry around yourself.
Vehicles: what the Garage, tractor and trucks each do
The vehicles this farm relies on split into three distinct jobs. The Garage costs $1,200 and creates the TRUCK BAY, the home base for trucks — and trucks are the haulers, since the core loop is driving your trucks to town to sell your goods. The Farm Bike is the $15 personal ride that carries you from the farm into Town Park, the same trip the sell-crops-in-town quests send you on. The tractor is the field machine: crops are built to be harvested with tractors rather than picked by hand, and once the Tractor Barn exists you can hand the wheel to a Tractor Driver entirely. Our guides cover how to use tractors and how to sell crops in more detail.
Worker upgrades: Walk Speed and Carry
The Farm Office also sells two upgrades that improve the workers you already have:
| Upgrade | Panel effect | Levels | Observed price |
|---|---|---|---|
| Walk Speed | +5% per worker | 0–10 | $1,500 |
| Carry | +20% per worker | 0–10 | $1,800 (shown at $2,970 later on) |
Upgrade prices climb as you buy levels — the same Carry upgrade that starts at $1,800 was displayed at $2,970 in later gameplay. Since caps limit how many workers each type allows, these upgrades are the other way to get more out of the slots you have already filled.
Where the cash for all this comes from
Cash spreads across every one of these systems, and the priorities are clear early on: more chicken coops mean extra eggs and steadier stand sales, seeds let you fill fields and bring in the tractor instead of harvesting everything by hand, and every hire keeps daily tasks moving while you focus on mining or driving trucks into town yourself. The mining guide covers that third loop, and how to get rich fast goes deeper on income. Before a big hire it is also worth a quick look at the current Run A Farm codes for anything on offer, and if you are still in your first session, the Run A Farm beginner guide walks through the earliest hours step by step. Buying up ground and buildings ties into farm expansion, and the egg side of the loop is covered in how to collect eggs and our chicken coop guide.
Related Guides
Workers: Where to Hire Them and What They Cost
Where to hire the Stocker, Planter, Farmhand and Tractor Driver, what each takes over, and observed hire costs.
Vehicles: What They Do and What They Cost
What the Farm Bike, tractors and trucks each do, with their confirmed prices and where you buy them.
Farm Expansion: What to Buy and What Each Step Costs
The full shopping list with prices, from the $50 Seed Market to the $1,200 Garage, in build order.
How to Get Rich Fast: The Activities That Pay
Which activities actually pay cash — eggs, crops, ore and quests — and the purchases that speed up each loop.